Hdhomerun Need to Be Setup Again for a Different Network
VirtualBox Network Settings: Complete Guide

In this modern business world, networking is a crucial component of interactive estimator operations. It is difficult to imagine how to exchange data between computers without networks in a earth where everything is changing at always-growing speed. One of the cardinal focal ideas behind hardware virtualization is the possibility to use virtual machines in about all cases where physical computers tin also be used. Thus, virtual machines must be able to connect to concrete and virtual networks with their virtual network adapters. Virtual machines running on VirtualBox tin be connected to different networks. VirtualBox provides multiple network modes for virtual machines. Today'due south web log post covers VirtualBox network settings to help you configure VirtualBox in the best way possible to suit your needs.
Below, the following VirtualBox network modes will be discussed and compared:
- Not Attached
- NAT
- NAT Network
- Bridged Adapter
- Internal Network
- Host-Only Adapter
- Generic Commuter
Virtual Network Adapters
Each VirtualBox VM can use up to eight virtual network adapters, each of which in plough is referred to every bit a network interface controller (NIC). 4 virtual network adapters can be configured in the VirtualBox GUI (graphical user interface). All virtual network adapters (up to 8) can be configured with the VBoxManage modifyvm command. VBoxManage is a command line management tool of VirtualBox that tin can be used for configuring all VirtualBox settings including VirtualBox network settings. VirtualBox network adapter settings can exist accessed in the virtual motorcar settings (select your VM, hit Settings and go to the Network department in the VM settings window).

There yous should see 4 adapter tabs. One virtual network adapter is enabled past default afterward virtual machine creation. Yous can tick the "Enable Network Adapter" checkbox to enable the adapter and untick the checkbox to disable (this checkbox defines whether a virtual network adapter device is connected to a VM or not).
Hit Advanced to expand advanced VirtualBox network adapter settings.
Data Protection with NAKIVO Fill-in & Replication
NAKIVO Fill-in & Replication delivers high-cease data protection for SMBs and enterprises with multiple backup, replication and recovery features, including VMware Backup , Hyper-V Backup , Role 365 Fill-in and more than.
Types of Virtual Network Adapters in VirtualBox
A virtual network adapter is a software-emulated physical device. There are 6 virtual adapter types that can be virtualized by VirtualBox.
- AMD PCnet-PCI II (Am79C970A). This network adapter is based on AMD chip and tin can be used in many situations. As for Windows guests, this network adapter can exist used for older Windows versions (such as Windows 2000) because newer Windows versions such as Windows 7, 8 and 10 practise non contain a congenital-in driver for this adapter. Originally, the Am79C970A PCI device contained a single scrap 10-Mbit controller and the DMA engine was integrated. This network adapter also supports AMD's Magic Package applied science for remote wake-up.
- AMD PCnet-FAST III (Am79C973). This virtualized network adapter is supported by virtually all guest operating systems that tin can run on VirtualBox. GRUB (the kick loader) tin use this adapter for network boot. Similarly to the previous network adapter, this one is based AMD chip.
- Intel PRO/k MT Desktop (82540EM). This adapter works perfectly with Windows Vista and newer Windows versions. The most of Linux distributions support this adapter as well.
- Intel PRO/1000 T Server (82543GC). Windows XP recognizes this adapter without installing additional drivers.
- Intel PRO/k MT Server (82545EM). This adapter model is useful to import OVF templates from other platforms and can facilitate import process.
- Paravirtualized Network Adapter (virtio-cyberspace) is a special example. Instead of virtualizing networking hardware that is supported by well-nigh operating systems, a guest operating system must provide a special software interface for virtualized environments. This approach allows you to avert the complexity of networking hardware emulating and, as a result, tin can improve network performance.
The industry standard virtIO networking drivers are supported past VirtualBox. VirtIO networking drivers are a function of the KVM project and are open-source. These drivers are available for Linux with kernel two.six.25 or after, and Windows including older versions such as Windows 2000, XP and Vista.
Colossal frames support
VirtualBox provides limited support for colossal frames (Ethernet frames that tin can carry packets which size is more i,500 bytes). If you lot need to utilise jumbo frames, select an Intel virtualized network adapter, and configure that adapter to piece of work in bridged mode. AMD-based virtual networks adapters don't support jumbo frames. If you effort to enable jumbo frames for AMD-based virtual network adapters, jumbo frames will exist dropped silently for input and output traffic. Jumbo frames are disabled by default.
VirtualBox Network Modes
VirtualBox provides a long listing of network modes, which is one of the well-nigh interesting features of VirtualBox network settings. Each virtual network adapter can be separately configured to operate in a different network manner. For case, you tin set the NAT mode for the adapter 1 and the Host-merely mode for the adapter 2. You lot can select the network style in the Fastened to driblet-down menu.

Permit'south consider each VirtualBox network style in detail.
Not fastened
A virtual network adapter is installed in a VM, but the network connection is missing, much like when you unplug the Ethernet network cable when using a physical network adapter. This mode can be useful for testing. For instance, yous tin can enable this network mode for a short time to emulate unplugging the cable. When you disable the Not Attached mode by switching to another network mode, the network connection becomes available again. You lot tin too check whether a DHCP customer obtains the IP address correctly, whether the appropriate awarding can resume downloading later link intermission or packet loss, then on.
Instead of using the Non Fastened network mode, you tin use any other network mode without ticking the Cable Connected checkbox. You can tick/untick the checkbox when a VM is in the running land (see the screenshot higher up). Don't forget to hit OK to utilise changes in the VM network configuration.
NAT
This network fashion is enabled for a virtual network adapter past default. A guest operating arrangement on a VM can admission hosts in a physical local area network (LAN) by using a virtual NAT (Network Address Translation) device. External networks, including the internet, are accessible from a guest OS. A invitee machine is not accessible from a host motorcar, or from other machines in the network when the NAT manner is used for VirtualBox networking. This default network way is sufficient for users who wish to employ a VM just for cyberspace access, for example.
The IP address of the VM network adapter is obtained via DHCP and the IP addresses of the network used in this network style cannot exist changed in the GUI. VirtualBox has a congenital-in DHCP server and NAT engine. A virtual NAT device uses the physical network adapter of the VirtualBox host every bit an external network interface. The default address of the virtual DHCP server used in the NAT manner is 10.0.2.2 (this is also the IP address of the default gateway for a VM). The network mask is 255.255.255.0.
If y'all configure the network adapters of two or more than VMs to apply the NAT style, each VM will obtain the 10.0.ii.xv IP address in its own isolated network behind a private virtual NAT device. The default gateway for each VM is ten.0.2.ii. In VirtualBox IP addresses are not inverse when the NAT manner is used, as y'all can run into below:

In order to enable theNAT style for a VM with VBoxManage, execute the following control:
VBoxManage modifyvm VM_name --nic1 nat
Where:
- VM_name is the name of your virtual machine;
- nic1 is the number of the virtual network adapter;
- nat is the name of the VirtualBox network mode that yous need to set.
Port forwarding can be configured right from the VirtualBox VM network settings window by clicking the Port forwarding button (seen in the screenshot above). Detailed information nearly configuring port forwarding in VirtualBox network settings, which you can find below after the Network Modes section.
NAT Network
This fashion is similar to the NAT mode that you use for configuring a router. If you utilize the NAT Network style for multiple virtual machines, they can communicate with each other via the network. The VMs can access other hosts in the physical network and can access external networks including the cyberspace. Any automobile from external networks also as those from a physical network to which the host machine is connected cannot access the VMs configured to use the NAT Network style (similarly to when you configure a router for net access from your home network). Y'all cannot access the invitee machine from the host machine when using the NAT Network mode (unless y'all are configuring port forwarding in global VirtualBox network settings). A built-in VirtualBox NAT router uses a physical network interface controller of the VirtualBox host as an external network interface (equally is the instance for the NAT manner).

The network address and name can exist changed in the global VirtualBox preferences (File > Preferences). In the left pane of the Preferences window, select Network to admission global VirtualBox network settings, so double click your existing NAT network to edit the settings (you lot can also add a new network or delete an existing network by clicking the + or ten icons).

In the modest pop-up window that will appear, it is also possible to enable/disable DHCP, IPv6 and configure port forwarding.

The default accost of theNatNetwork is x.0.ii.0/24.
The default gateway IP is 10.0.2.1 (the x.x.x.one template is used to assign the default gateway IP). For case, if you create a new virtual network for the NAT Network manner in VirtualBox and set the 192.168.22.0/24 network accost, the IP address of the gateway in this network volition be 192.168.22.1. You cannot change the IP address of the gateway for the network used in the NAT Network mode and change the range of IP addresses issued by the DHCP server. Similarly, the IP accost of the DHCP server is x.0.2.3 by default (the 10.x.ten.3 template is used).
The IP configuration of the Windows 7 VM running on VirtualBox with a virtual network adapter configured in the NAT Network mode is displayed on the screenshot.

If you don't want to edit VirtualBox network settings in the GUI, you tin can add a new NAT network with VBoxManage past using the command:
VBoxManage natnetwork add --netname natnet1 --network "192.168.22.0/24" --enable
Where:
- natnet1 is the name of the NAT network;
- 192.168.22.0/24 is the address of that NAT network.
If you want to configure a VM network adapter in order to use theNAT Network mode with VBoxManage, run the following command:
VBoxManage modifyvm VM_name --nic1 natnetwork
Where:
- nic1 is the get-go virtual network adapter (network interface controller);
- natnetwork is the name of the VirtualBox network manner.
You may demand to shut downward the VM before applying these settings.
In guild to avoid repeating the same command with VBoxManage when selecting a network mode for the virtual network adapter of a VM in each department of the article, consider the names of all possible VirtualBox network modes:none, null, nat, natnetwork, bridged, intnet, hostonly, generic.
Port forwarding is 1 more option that can exist accessed and configured from this window. Port forwarding tin be used to configure access from the host machine and other hosts of the aforementioned physical network to the services running on the invitee Os inside the VM (see details below). As you tin can see, the location of the port forwarding settings for the NAT fashion and NAT Network modes are different in the VirtualBox GUI. Port forwarding settings for the NAT mode are bachelor in VM > Settings > Network while port forwarding settings for the NAT Network mode can be configured in File > Preferences > Network. This is considering port forwarding rules for the NAT mode are individual for each VM while port forwarding rules for the NAT Network manner are common for multiple VMs whose adapters are continued to the appropriate NAT network. Encounter details nearly configuring port forwarding beneath in the Port Forwarding department.
Bridged Adapter
This mode is used for connecting the virtual network adapter of a VM to a concrete network to which a physical network adapter of the VirtualBox host car is connected. A VM virtual network adapter uses the host network interface for a network connection. Put just, network packets are sent and received directly from/to the virtual network adapter without additional routing. A special net filter driver is used by VirtualBox for a bridged network fashion in order to filter information from the physical network adapter of the host.
This network mode tin exist used to run servers on VMs that must be fully accessible from a concrete local area network. When using the bridged network mode in VirtualBox, yous tin access a host machine, hosts of the concrete network and external networks, including internet from a VM. The VM can be accessed from the host car and from other hosts (and VMs) continued to the concrete network.
If you lot take multiple concrete network adapters on the host machine, y'all should select the right adapter in VirtualBox network settings. On the screenshot below you tin see 2 physical network adapters – Ethernet adapter and Wi-Fi adapter . If yous utilise the bridged way for a wireless network adapter, y'all cannot use low-level features of that Wi-Fi adapter in a guest operating organisation. For case, you cannot select Wi-Fi networks to connect to, enable the monitoring fashion, etc. Instead, yous need to connect to the Wi-Fi network on the host machine. If you take to use all features of the Wi-Fi adapter in the guest Os of the VM, utilize a USB Wi-Fi adapter and the USB Laissez passer-through feature as explained in the blog post nearly installing Kali Linux on VirtualBox.

In VirtualBox, the IP accost of a VM virtual network adapter can vest to the aforementioned network as the IP accost of the physical network adapter of the host machine when the bridged style is used. If at that place is a DHCP server in your physical network, the virtual network adapter of the VM will obtain the IP address automatically in the bridged mode (if obtaining an IP accost automatically is fix in the network interface settings in a guest OS). Thus, the default gateway for a virtual network adapter operating in the bridged mode is the same equally for your host automobile. Let'due south expect at a simple example with IP addresses.
The address of the physical network: 10.10.10.0/24
The IP address of the default gateway in the physical network: 10.10.10.ane
The IP address of the DHCP server in the concrete network: 10.10.ten.i
IP configuration of the host machine: The IP address – 10.10.x.72; netmask – 255.255.255.0; default gateway – 10.ten.10.1.
IP configuration of the guest auto: The IP accost – ten.10.x.91; netmask – 255.255.255.0; default gateway – 10.10.ten.1.

Sometimes, you may observe that you have multiple gateways in your physical network. You lot tin can use a host machine for connecting to necessary networks via ane gateway and use a guest machine for connecting to other networks via the second gateway. Yous can as well edit a routing table on your VM and add together routes for using both gateways to connect to the appropriate networks. As you tin can see, the bridged network way is a powerful option in VirtualBox network settings with a lot of use cases.
Promiscuous style. This manner allows a network adapter to pass all received traffic, no matter to which adapter the traffic is addressed. In normal mode, a network adapter receives simply frames that include the MAC address of this item network adapter as the destination address in the header. The frames that are addressed to a MAC address which differs from the MAC address of the selected adapter (when traffic is not broadcast) are dropped when in normal way. The promiscuous mode makes information technology possible for a concrete network adapter to take multiple MAC addresses, assuasive all incoming traffic to pass the physical network adapter of the host car and accomplish the virtual network adapter of the VM which has its ain MAC address that is represented on the host adapter, even if that traffic is not addressed to the virtual network adapter of that particular VM.
Well-nigh wireless network adapters don't support the promiscuous manner. Bridging to Wi-Fi adapters is done in post-obit mode – VirtualBox replaces the appropriate MAC addresses in the headers of Ethernet frames that must be delivered to the virtual network adapter of the VM (the MAC address of the host Wi-Fi adapter must be used for that traffic). The promiscuous way is useful for network testing and security audits. You can enable the promiscuous way in VirtualBox network settings and monitor network traffic with a sniffer.
There are three options of using the promiscuous fashion.
- Deny. Any traffic that is not intended to the virtual network adapter of the VM is subconscious from the VM. This selection is fix by default.
- Permit VMs. All traffic is hidden from the VM network adapter except the traffic transmitted to and from other VMs.
- Allow All. At that place are no restrictions in this mode. A VM network adapter tin can encounter all incoming and outgoing traffic.
The Promiscuous mode tin be used not merely for the Bridged network mode, but also for NAT Network, Internal Network and Host-Only Adapter modes.
Internal Network
Virtual machines whose adapters are configured to piece of work in the VirtualBox Internal Network way are connected to an isolated virtual network. VMs connected to this network tin communicate with each other, but they cannot communicate with a VirtualBox host machine, or with any other hosts in a concrete network or in external networks. VMs connected to the internal network cannot be accessed from a host or any other devices. The VirtualBox internal network tin can be used for modelling real networks.
For example, you can create 3 VMs, each of which has a virtual network adapter (Adapter 1) connected to the internal network. The IP addresses of these network adapters are defined from the subnet used for the VirtualBox internal network (y'all should define the subnet manually). I of these VMs (VM1) besides has a second virtual network adapter that is configured to operate in the NAT mode. The VM1 is configured equally a router (1 of the best solutions for creating a router is to install Linux and configure IPTABLES, but for the first time you tin can employ simpler routing solutions in a case of VirtualBox network testing).
A VM2 and VM3 whose network adapters are connected simply to the VirtualBox internal network tin can take admission to external networks if the IP address of the internal network adapter of the VM1 are gear up equally a gateway in the network settings of VM2 and VM3.
Network configuration used in this instance:
VM1. IP address – 192.168.23.1 (internal network fashion); 10.0.ii.xv (NAT fashion), gateway ten.0.2.2 (the IP address of the built-in VirtualBox NAT device).
VM2. IP address – 192.168.23.2 (internal network), gateway – 192.168.23.one
VM3. IP address – 192.168.23.3 (internal network), gateway – 192.168.23.ane
VirtualBox internal network subnet: 192.168.23.0/24
Run across the diagram beneath for more clarity.

Note: You can also deploy such virtual infrastructure for testing firewall rules in IPTABLES earlier implementing them in your real network infrastructure, only it is preferable to use the bridged mode and not the NAT mode for the second virtual network adapter of the VM1 when connecting to/from external networks.
Host-only Adapter
This network manner is used for communicating between a host and guests. A VM can communicate with other VMs connected to the host-but network, and with the host machine. The VirtualBox host motorcar tin can access all VMs connected to the host-only network.

The VirtualBox Host-Only virtual network adapter is created in a host operating organization for use in the host-only network. You can edit settings of this VirtualBox network past going to File > Host Network Director.
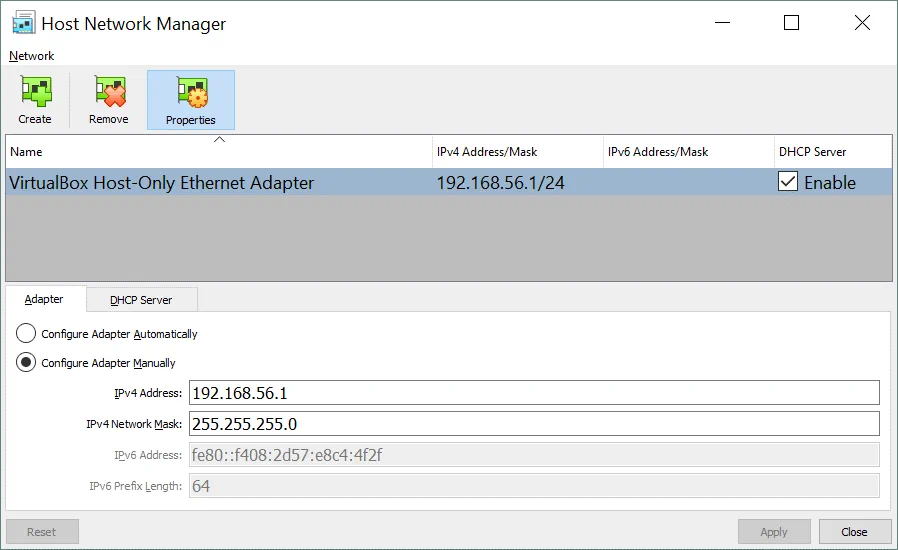
In our case, the default network address of the host-but network is 192.168.56.0/24 and the IP address of the virtual network adapter on the host machine is 192.168.56.1. Y'all can edit these IP addresses manually in the Adapter tab. A DHCP server can be enabled or disabled by ticking the appropriate checkbox. In the DHCP Server tab, you lot can set the IP accost of the DHCP server, netmask and the range of IP addresses to be issued for DHCP clients.

The virtual network adapters of the VMs don't take a gateway in their IP configuration considering the Host-But mode doesn't allow you to connect to any devices outside the host-simply network. It is also possible to create more than one VirtualBox host-merely network adapter in social club to use different host-only networks—merely press the Create button. If the host-only network is no longer needed, just select the adapter and hitting Remove.
Generic Commuter
This network fashion allows y'all to share the generic network interface. A user can select the appropriate driver to exist distributed in an extension pack or be included with VirtualBox.
Two sub-modes are available for VirtualBox Generic Driver mode – UDP Tunnel and VDE (Virtual Distributed Ethernet) Networking.
UDP Tunnel. Virtual machines that run on unlike hosts can communicate transparently by using an existing network infrastructure.
VDE Networking. Virtual machines tin connect to a virtual distributed switch on Linux or FreeBSD hosts. You demand to compile VirtualBox from sources to use VDE networking since standard VirtualBox packages don't include this feature.
Comparison of VirtualBox Network Modes
For more convenience, permit's summarize all data about network modes supported past VirtualBox in this table:

Port Forwarding
Port forwarding is a process of intercepting traffic addressed to the advisable IP address and port in addition to redirecting that traffic to a different IP address and/or port. Special applications tin be used on computers and other router devices to configure port forwarding. Ane of the near popular use cases for port forwarding is by providing access to particular network services that are hidden behind the NAT from external networks. Subsequently configuring port forwarding rules, clients can admission the appropriate services from outside past connecting to the router's (host'southward) external IP address and specified port.
The packets are first intercepted by an application on the router, so the application reads the destination IP address and port number of the appropriate headers (IP packet headers, headers of TCP or UDP segments). If a combination of the destination IP address and/or port number in headers matches a condition prepare in a port forwarding rule, the routing application rewrites the header information (IP accost and/or port number) and sends a package/segment to another network interface co-ordinate to the port forwarding rule.
Past default, connecting to VirtualBox VMs whose network adapters are ready to operate in the NAT or NAT Network style is incommunicable from a VirtualBox host and other hosts in LAN, but VirtualBox provides a congenital-in port forwarding characteristic to enable such access.
Case 1 – SSH access
Let's now consider configuring port forwarding for connecting to VirtualBox VMs using the example of connecting to an SSH server running on an Ubuntu Linux VM that is continued to the network by the NAT mode. You can read how to install Ubuntu on VirtualBox in this blog postal service.
The input information:
Host IP:10.10.10.72 (a concrete NIC).
Ubuntu VM IP:10.0.2.fifteen (NAT mode)
User proper name:user1
1. Install the SSH server on the Ubuntu VM.
apt-become install openssh-server
2. Edit the SSH server configuration file.
vim /etc/ssh/sshd_config
iii. Uncomment the string for enabling authentication with passwords.
PasswordAuthentication yeah
4. Restart the SSH daemon (service).
/etc/init.d/ssh restart
5. Verify that the SSH server is working and try to connect to the SSH server from localhost (Ubuntu VM).
ssh user1@127.0.0.ane
half-dozen. If everything is OK, you tin can start configuring port forwarding in VirtualBox.
As yous recall, you lot should open upVM settings and select theNetwork section. Select your virtual network adapter that is configured to work in theNAT mode, expandAdvancedsettings and hit thePort Forwarding push. Click the+ icon to add a new port forwarding dominion in VirtualBox network settings of the VM.

An SSH server listens the 22-nd TCP port past default. Let's create a rule that allows y'all to forward all connections to the VirtualBox host car on port 8022 to the Ubuntu VM on port 22 that is listened past SSH server. First, you tin can create a dominion that allows for connections only from the VirtualBox host.
| Proper name | Protocol | Host IP | Host Port | Guest IP | Invitee Port |
| Ubuntu-SSH | TCP | 127.0.0.i | 8022 | 10.0.2.xv | 22 |
The view of the port forwarding rules window in the VirtualBox GUI is shown on the screenshot below.

Open an SSH customer (for example, PuTTY if yous employ Windows) on your VirtualBox host and connect to 127.0.0.ane on port 8022.
Other hosts in your concrete network will be able to admission the Ubuntu VM via SSH by connecting to the VirtualBox host machine on port 8022 if you lot create a similar port forwarding rule where the real IP address of your physical network adapter of the VirtualBox host will exist defined instead of the localhost IP address (127.0.0.1). In this example, the IP address of the physical NIC on the VirtualBox host is 10.10.10.72.
| Name | Protocol | Host IP | Host Port | Guest IP | Guest Port |
| Ubuntu-SSH | TCP | x.10.10.72 | 8022 | ten.0.2.xv | 22 |
Open an SSH client on your VirtualBox host or on another host attached to your LAN and connect to your VirtualBox host IP on port 8022.
Example 2 – HTTP access
If you want to deploy a spider web server on your VM and provide admission to your web sites from outside, you can add another port forwarding dominion. Permit's consider how to configure that port forwarding rule for accessing a web site deployed on an Ubuntu VM from a VirtualBox host machine and other machines connected to the physical local area network (LAN). Apache is used as a spider web server in this instance.
First, install Apache on the Ubuntu VM running on VirtualBox.
apt-get install apache2
The ufw firewall is disabled in Ubuntu by default. If a firewall is enabled on your Ubuntu VM, make certain that access to the TCP 80 port is enabled.
After installing Apache, open a web browser on your Ubuntu VM and access the default Apache page by entering http://127.0.0.1 in the address bar. If everything is OK, you lot will see the Apache2 Ubuntu default page in your web browser.
This means that now you can configure a port forwarding rule in VirtualBox network settings for accessing your web site hosted on the Ubuntu VM. Open the Port Forwarding settings window by going to VM settings > Network > [select your adapter] > Port Forwarding (similarly as explained above). You can add together a new rule by doing the following:
| Name | Protocol | Host IP | Host Port | Guest IP | Guest Port |
| Ubuntu-HTTP80 | TCP | ten.10.x.72 | 8080 | x.0.2.15 | 80 |
Open up a web browser on your host machine or on whatsoever other auto continued to your concrete network and enter the IP address of your VirtualBox host auto and port defined in the port forwarding rule created above:
http://ten.ten.ten.72:8080
In the current example, 10.10.10.72 is the IP address of the VirtualBox host machine and 8080 is a TCP port listened on the VirtualBox host machine. A positive result of configuring port forwarding is shown on the screenshot beneath.

You can too create like rules for accessing a VM via RDP, FTP and other protocols.
Configuring port forwarding for VMs whose virtual network adapters piece of work in the NAT Network mode functions similarly (run into the department above where the NAT Network mode is explained for locating port forwarding settings for the NAT Network mode).
Determination
VirtualBox is a powerful virtualization solution that is flexible and provides a broad range of network settings. Each VM can use upwards to eight virtual network adapters, and each network adapter tin be emulated as the appropriate model of real Intel and AMD network interface controllers (NICs). VirtualBox network adapter settings allow you to modify the MAC address of each virtual NIC, plug or unplug the virtual network cablevision, and select the network mode. Setting the network manner for a virtual network adapter is one of the nearly interesting and of import parts of VirtualBox network settings. At that place are six network modes, each of which can be utilized for different employ cases. Port forwarding can exist configured for external access to VMs whose network adapters operate in NAT or NAT Network modes.
Today's blog post has covered VirtualBox network settings, merely if you want to acquire more about VirtualBox, you are welcome to bank check out our blog posts virtually VirtualBox usage, installing VirtualBox Extension Pack, and updating VirtualBox. You can also read web log posts virtually comparing VirtualBox with VMware and Hyper-V, where network settings of these virtualization platforms are discussed as well.

Source: https://www.nakivo.com/blog/virtualbox-network-setting-guide/
0 Response to "Hdhomerun Need to Be Setup Again for a Different Network"
Post a Comment